|
|
||
|---|---|---|
| .. | ||
| img | ||
| Makefile | ||
| README.md | ||
| toplevel.pcf | ||
| toplevel.v | ||
README.md
This example is for the Lattice iCE40HX-8K Breakout Board.
An image of this board is shown below;
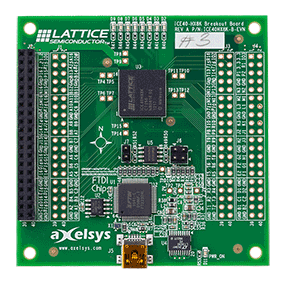
This board can be purchased for ~$USD 49 directly from Lattice and is supported
by the IceStorm
iceprog tool.
Using the example
Before Starting
Before starting make sure that your board is configured for CRAM Programming
mode. This requires removing jumper J7 and putting the pair of jumpers on
J6 to be parallel to the text on the board.
This is shown in Figure 5 of the iCE40HX-8K Breakout Board User Guide. which is also reproduced below;

Once your board is ready, you should follow the setup instructions at the top level.
You should make sure you have the following tools installed;
- Yosys
- arachne-pnr
- icestorm tools (like icepack and iceprog)
- riscv toolchain
- sbt
Building
You should be able to just type make compile and get output similar to this;
...
  place time 10.14s
route...
  pass 1, 15 shared.
  pass 2, 4 shared.
  pass 3, 1 shared.
  pass 4, 0 shared.

After routing:
span_4     4406 / 29696
span_12    951 / 5632

  route time 9.12s
write_txt bin/toplevel.asc...
icepack bin/toplevel.asc bin/toplevel.bin
The process should take around 30 seconds on a reasonable fast computer.
Programming
After building you should be able to run make prog. You may need to run make sudo-prog if root is needed to access your USB devices.
You should get output like the following;
iceprog -S bin/toplevel.bin
init..
cdone: high
reset..
cdone: low
programming..
cdone: high
Bye.
After programming the LEDs at the top of the board should start flashing in an interesting pattern.
Connect
After programming you should be able to connect to the serial port and have the output echoed back to you.
On Linux you can do this using a command like screen /dev/ttyUSB1. Then as
you type you should get back the same characters.